Unlock Your Creativity: Stunning Blue Tip Nail Designs You Can't Resist!
Blue tip nails have taken the nail art world by storm, captivating enthusiasts with their unique charm and versatility. Unlike traditional nail designs that often stick to predictable colors, blue tips offer an exciting twist that can suit any aesthetic—from chic and elegant to bold and playful. Whether you're dressing up for a special event or simply looking to express your creativity, blue tip nails provide a canvas for endless possibilities. The purpose of this article is to inspire you with a variety of designs and ideas that can elevate your nail game to the next level. Let's dive into the world of blue tip nails and discover what makes them a must-try trend!
Exploring Different Blue Tip Nail Designs
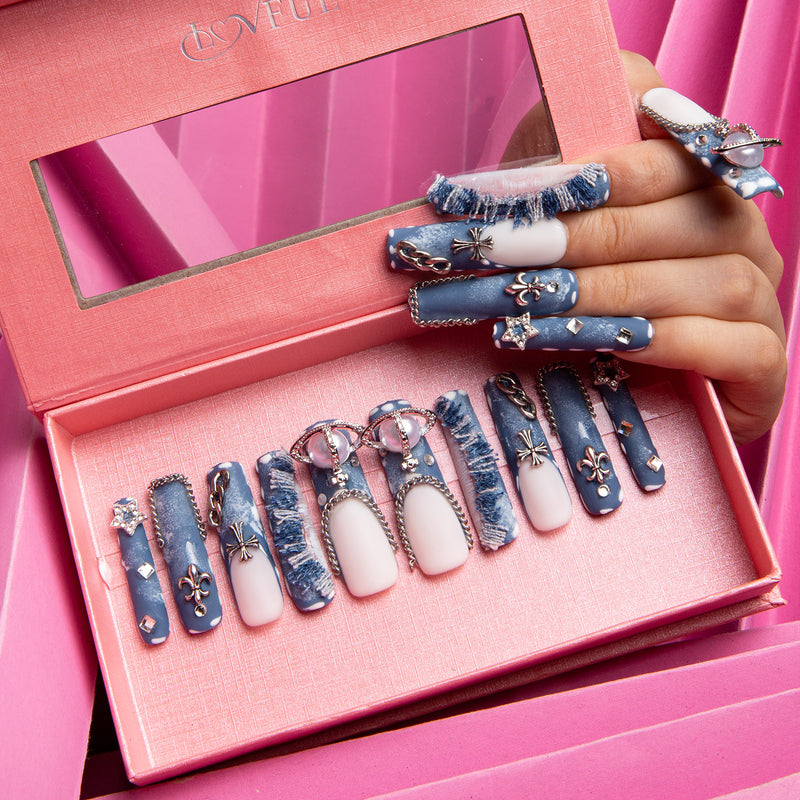
When it comes to blue tip nails, the design options are as vast as the ocean. From the classic French tip reimagined in shades of blue to modern ombre effects and intricate geometric patterns, there's something for every taste. Blue can be paired beautifully with other colors, allowing for creative combinations that stand out. For instance, a light blue tip can complement a pastel base, while a deep navy can add sophistication to a nude nail. The beauty of blue tips lies in their ability to adapt to various themes and occasions, making them perfect for everything from casual outings to formal gatherings. Let’s explore some standout designs that will inspire you to pick up that nail polish and start creating!
Classic Blue French Tips
The classic French tip is a timeless design that can benefit from a refreshing blue twist. To achieve this look, start with a neutral base coat—think soft pink or beige. Once dry, carefully apply a vibrant or pastel blue to the tips using a fine nail brush or nail striping tape for precision. Shades like sky blue or cobalt can create a stunning contrast against the base. This design is not only elegant but also allows for personalization; you can choose to keep the tips sleek and simple or add embellishments like glitter or tiny gems for an extra touch of glamour.
Ombre Blue Tips
The ombre technique is perfect for those who love subtle gradients and blended colors. For ombre blue tips, select two or three shades of blue that complement each other, such as a light baby blue, a medium azure, and a deep navy. Start by applying the lightest shade at the base of your nail and gradually blend in the darker shades towards the tips using a makeup sponge. This technique allows for smooth transitions and a dreamy effect that is visually captivating. Ombre blue tips are especially popular for summer and beach-themed events, giving your nails a fresh and airy look.
Geometric and Artistic Designs
If you're feeling adventurous, geometric and artistic designs with blue tips can truly showcase your creativity. Think sharp lines, triangles, and playful shapes that incorporate blue as a standout feature. You can use tape to create clean lines or even experiment with freehand designs using a fine brush. Adding contrasting colors like white or gold can make the blue pop even more. My friend recently tried a design where she alternated between blue tips and abstract shapes on a nude base, and it turned out to be a real head-turner! The key to these artistic designs is to have fun and let your creativity flow.
Application Techniques for Blue Tip Nails
To ensure your blue tip nails look flawless, it's essential to master the application techniques. The process starts with nail preparation, which sets the foundation for a smooth application. Choose the right tools to achieve precision and polish your nails to perfection. Finally, don't skimp on the finishing touches; a good top coat can enhance the longevity and shine of your nail art. Here’s a step-by-step guide to help you get those blue tips looking their best!
Nail Preparation
Before diving into the exciting world of nail art, proper nail preparation is crucial. Start by trimming and filing your nails to your desired shape. Buff the surface gently to create a smooth canvas, and clean your nails with a gentle nail cleanser to remove any oils or dirt. This step not only helps the polish adhere better but also ensures a professional finish. If you have dry cuticles, consider applying a cuticle oil to nourish them, making your nails look neat and polished.
Tool Selection and Application
Selecting the right tools is vital for achieving perfect blue tip designs. A fine brush is essential for precision work, especially when applying the blue tips. For ombre designs, consider using a makeup sponge to blend colors seamlessly. Dotting tools can also come in handy for creating intricate patterns or adding details to your design. Make sure to have some nail tape on hand for clean lines, particularly when creating geometric designs. A steady hand and a bit of practice can go a long way in perfecting your application technique.
Finishing Touches
Once you've achieved the desired nail art, it’s time for the all-important finishing touches. Applying a top coat can enhance the shine and add a layer of protection to your design, making it last longer. Choose a quick-drying top coat for convenience, especially if you're on the go. To care for your blue tip nails, avoid exposing them to harsh chemicals and consider wearing gloves while doing chores. Regularly moisturizing your cuticles can also help maintain the overall look and health of your nails.
Embrace Your Blue Tip Nail Journey
In this article, we've explored the vibrant world of blue tip nail designs, highlighting their creativity and versatility. From classic French tips to trendy ombre effects and artistic geometric patterns, blue tips can be adapted to fit any style or occasion. Remember, nail art is all about expressing yourself, so don't hesitate to experiment with different shades, patterns, and techniques. Whether you're a nail art novice or an experienced enthusiast, we encourage you to unleash your creativity and share your stunning blue tip creations with friends and family!