Making your own concrete pots at home is a fun and rewarding DIY project. With a few basic materials and some creativity, you can create custom planters that add a modern, industrial touch to your garden or indoor space. This guide will walk you through the entire process, from gathering supplies to finishing your handmade concrete pots.
Materials You Will Need
Before starting, gather all the necessary materials to ensure a smooth process. You will need Portland cement, which is the main ingredient for making concrete. Sand is another essential component, as it helps create a strong and workable mix. A fine aggregate like perlite or vermiculite can be added for a lighter texture if desired. Water is required to mix the concrete to the right consistency.
For molding the pots, you will need two containers of different sizes to act as forms. Plastic buckets, food containers, or even cardboard boxes can work well. Cooking spray or oil will help in releasing the concrete from the molds. A mixing bucket or wheelbarrow is necessary for combining the materials, along with a trowel or stick for stirring. Safety gear such as gloves, a dust mask, and goggles are important to protect yourself during the mixing and pouring stages.
Choosing the Right Molds
Selecting the right molds is crucial for achieving the desired shape and size of your concrete pots. The outer mold determines the exterior shape, while the inner mold creates the hollow space for soil and plants. For small to medium pots, plastic food storage containers work well. Larger planters can be made using old buckets or sturdy cardboard boxes lined with plastic.
Ensure that the inner mold is smaller than the outer one, leaving enough wall thickness for durability. A good rule of thumb is to maintain at least an inch of concrete between the two molds. If you want decorative textures, consider using molds with patterns or pressing objects like leaves or fabric into the wet concrete before it sets.
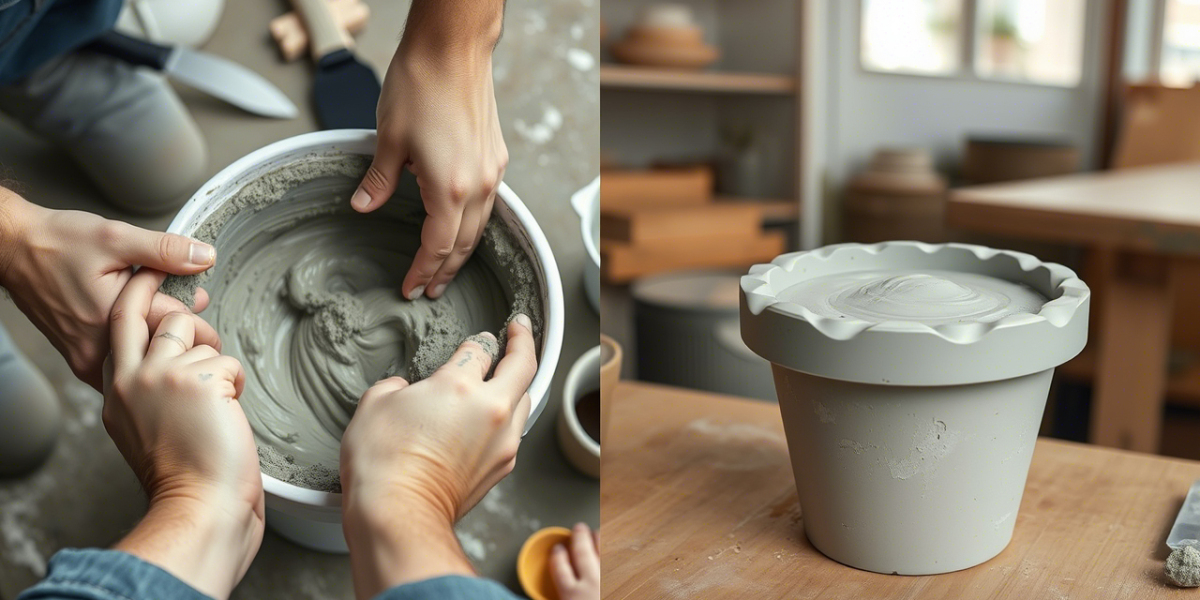
Mixing the Concrete
The key to a strong and crack-resistant pot is the right concrete mix. Start by combining one part Portland cement with two parts sand in your mixing container. If you prefer a lighter mix, replace some of the sand with perlite or vermiculite. Slowly add water while stirring until the mixture reaches a thick, pancake-like consistency.
Avoid making the mix too watery, as this can weaken the final product. Test the consistency by pressing a small amount in your hand; it should hold its shape without crumbling or dripping. If the mixture is too dry, add a little more water. Mix thoroughly to eliminate lumps and ensure even distribution of materials.
Pouring and Setting the Concrete
Once your mix is ready, prepare the molds by coating the inside of the outer mold and the outside of the inner mold with cooking spray or oil. This step prevents the concrete from sticking and makes removal easier. Pour the concrete into the outer mold, filling it about one-third of the way. Tap the sides gently to remove air bubbles and level the surface.
Place the inner mold inside the outer one, pressing it down slightly to create the base of the pot. If needed, weigh it down with rocks or sand to keep it in place. Continue pouring concrete around the inner mold until it reaches the top. Smooth the surface with a trowel and tap the mold again to release trapped air. Let the concrete set for at least 24 to 48 hours before attempting to remove the molds.
Removing the Molds and Finishing Touches
After the concrete has cured for a day or two, carefully remove the outer mold first. If using plastic containers, you may need to cut or peel them away. The inner mold can then be gently loosened and taken out. If the concrete is still slightly soft, allow more time to dry before handling.
Once the molds are removed, inspect the pot for rough edges or imperfections. Use sandpaper or a file to smooth any uneven areas. For a polished look, you can apply a concrete sealer to protect the surface from moisture and enhance its appearance. If desired, paint the pot with outdoor-grade acrylic paint or leave it in its natural gray finish for a minimalist look.
Curing and Sealing the Concrete
Proper curing is essential for the strength and durability of your concrete pot. After demolding, let the pot cure in a shaded, moist environment for at least a week. Lightly misting it with water daily helps prevent cracking as it fully hardens. Avoid placing it in direct sunlight during this period, as rapid drying can cause weak spots.
Once fully cured, apply a concrete sealer to protect the pot from water damage and weathering. This step is especially important for outdoor planters exposed to rain and temperature changes. Choose a breathable sealer if using the pot for live plants, as it allows moisture to escape while still providing protection.
Decorating Your Concrete Pots
Personalizing your concrete pots can make them stand out in your garden or home. Consider adding color by mixing concrete dye into the wet mix before pouring. Stencils or hand-painted designs can create unique patterns on the surface. For a rustic look, press stones, shells, or mosaic tiles into the wet concrete before it sets.
Another creative option is embedding objects like glass pieces or metal accents into the sides of the pot. If you prefer a smooth, modern appearance, polish the surface with fine-grit sandpaper and apply a glossy sealant. The possibilities are endless, so let your creativity guide you in designing pots that match your style.
Tips for Successful Concrete Pot Making
Working with concrete requires patience and attention to detail. Always measure your materials accurately to ensure a consistent mix. If the concrete dries too quickly, cover it with plastic to retain moisture during the initial curing phase. For larger pots, reinforce the structure with wire mesh or fiber strands to prevent cracking.
Experiment with different mold shapes and sizes to create a variety of pots. If a pot cracks during drying, you can repair it with a small amount of fresh concrete mix. Remember that imperfections can add character, so don’t worry if your first attempts aren’t perfect. With practice, you’ll develop techniques for making professional-looking concrete pots at home.
Conclusion
Making DIY cast concrete pots is an enjoyable project that yields beautiful, functional results. By following these steps, you can create custom planters tailored to your space and style. Whether for indoor succulents or outdoor flowers, handmade concrete pots add a unique touch to any setting. Gather your materials, experiment with designs, and enjoy the process of crafting your own durable and stylish planters.