Unleash Your Creativity: Discover the Best Studio Lights That Transform Your Space!
Lighting is a fundamental element in photography that can make or break a shot. The right studio lights can enhance your creativity by providing the perfect illumination for your artistic vision. Whether you are a budding photographer or a seasoned pro, investing in quality studio lights can dramatically improve the quality of your work. With a plethora of options available in the market, it’s essential to navigate through the choices wisely. Considerations such as the type of photography you engage in, your budget, and the physical space you have for your studio are all crucial when selecting the ideal studio lighting setup.
Understanding Studio Lights
Studio lights are specially designed lighting equipment used in photography studios to control the light quality and direction. Unlike natural light, which can be unpredictable, studio lights allow photographers to create consistent lighting conditions that enhance the visual appeal of their images. The primary purpose of studio lights is to illuminate the subject effectively, ensuring that details are captured accurately. They differ from other types of lighting, such as ambient lighting or flash photography, in that they provide adjustable brightness, color temperature, and can be modified with different accessories like softboxes and reflectors. Understanding the basic principles of light in photography—such as exposure, contrast, and shadows—is essential for making the most of studio lighting. Good lighting not only helps in setting the mood but also draws attention to the subject, creating a compelling story within the frame.
Types of Studio Lights
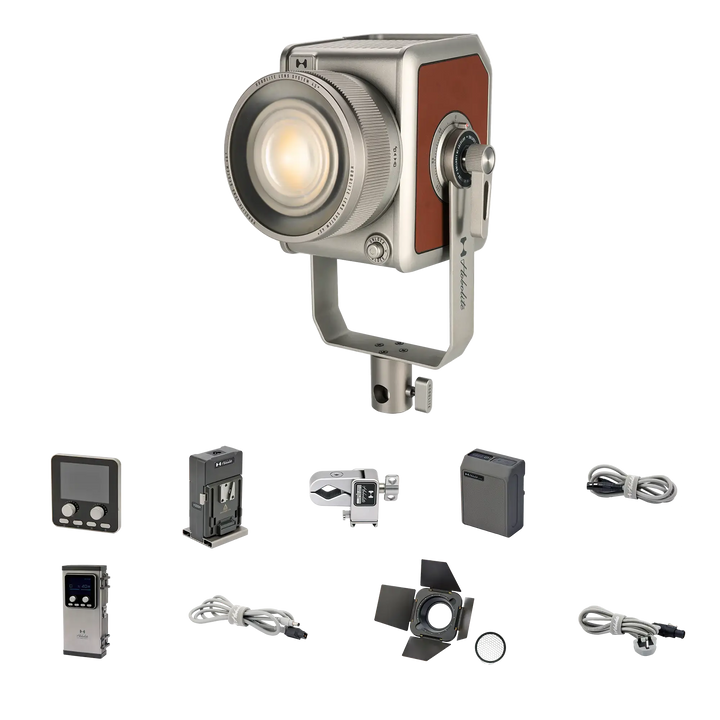
When it comes to studio lights, there are several types to choose from, each with its advantages and disadvantages. Continuous lights provide a constant source of illumination, making it easier to see how shadows and highlights play across a subject. They are user-friendly, especially for beginners, as they allow you to see the effect of lighting in real-time. Strobe lights, on the other hand, emit a burst of light, which can freeze motion and create sharp images. They typically require more skill to use effectively, but the results can be stunning. LED lights have gained popularity for their energy efficiency and versatility. They can produce different color temperatures and are often more compact than traditional lights. However, LED lights can sometimes lack the intensity of strobe lights. Each type of studio light serves a particular purpose, so understanding their functions will help you choose the best fit for your photography needs.
Choosing the Right Studio Lights for Your Needs
When selecting studio lights, there are several factors to consider. Start by assessing your budget; studio lights can vary significantly in price, from affordable options to high-end professional gear. Next, think about the space you have available. If you're working in a small area, compact and portable lights may be more suitable. Additionally, consider the type of photography you will be undertaking. For portrait photographers, soft and diffused lighting might be ideal, while product photographers may need sharper and more controlled lighting. Don’t forget to evaluate the features you need, such as adjustable brightness, color temperature controls, and compatibility with lighting modifiers. Lastly, getting feedback from friends or colleagues who have experience can be invaluable. Their insights can guide you toward making the best choice for your specific requirements.
Price Ranges and Budgeting for Studio Lighting
The price of studio lights can range widely based on the type and features. Entry-level continuous lights may start at a lower price point, suitable for hobbyists or those just starting. Mid-range options typically offer more features, such as adjustable power and built-in modifiers, making them great for semi-professionals. High-end studio lights, often preferred by professional photographers, come with advanced technology and superior performance, but they require a larger investment. When budgeting for studio lighting, consider not only the initial purchase but also additional expenses like light stands, softboxes, or reflectors. Creating a budget will help you prioritize your needs and avoid overspending while still achieving quality results in your photography.
Setting Up Your Studio Lights
Setting up studio lights effectively is crucial for achieving optimal results in your photography. Start by positioning your lights at angles that complement your subject; typically, a 45-degree angle is a good starting point for portraits. Experiment with different heights and distances to see how they affect the light quality on your subject. Using modifiers, such as softboxes or umbrellas, can diffuse harsh light and create a softer, more flattering look. Additionally, consider the background and how the lighting interacts with it. It’s beneficial to experiment with various setups to understand the impact of light on your images. Friends who are photographers often share stories of how trial and error helped them discover their signature lighting style. Don't hesitate to test and refine your approach until you find what works best for you.
Enhancing Your Photography with Studio Lighting
In conclusion, selecting the right studio lights can significantly enhance your photography and unleash your creativity. By understanding the different types of lights available, considering your specific needs, and budgeting wisely, you can make an informed decision that will elevate your work. Remember, the journey into studio lighting is a process of exploration and experimentation. As you dive into the world of photography with your new studio lights, don't shy away from trying different setups and learning from each experience. Embrace the adventure and enjoy capturing stunning images that reflect your artistic vision.