Unlock the Secrets of Studio Lighting: Transform Your Photography Today!
Studio lighting is a fundamental aspect of photography that can make or break an image. Whether you're a professional photographer or an enthusiastic hobbyist, understanding the various types of studio lighting equipment is crucial for creating stunning visuals. Proper lighting can enhance the mood, highlight important details, and elevate the overall quality of your photos. In this article, we'll explore the different types of studio lighting equipment available, their unique features, and how each can significantly impact your photography. With the right tools and techniques, you'll be able to capture breathtaking images that resonate with your audience.
Understanding Studio Lighting Equipment
Studio lighting equipment encompasses a variety of tools designed to manipulate light in a controlled environment. The basic principles of lighting in photography revolve around three key elements: intensity, direction, and quality. By understanding these principles, photographers can effectively use different types of lighting equipment to achieve specific effects. For instance, adjusting the intensity can create dramatic shadows, while changing the direction of light can enhance textures and shapes in your subject. Various equipment types, from continuous lights to strobes, offer unique advantages and applications, allowing you to experiment with different techniques and styles. I remember when a friend of mine first set up their home studio; they were amazed at how different light positions could transform the same subject. This experimentation is not only educational but also essential for developing your photographic style.
Types of Studio Lighting Equipment
When it comes to studio lighting, there are several types of equipment to choose from. Each type has its own characteristics and ideal use cases, allowing photographers to tailor their lighting setup to their specific needs. Below, we delve into the most common types of studio lighting equipment.
1. Continuous Lighting
Continuous lighting provides a constant light source, making it easier for photographers to see how the light interacts with their subjects in real-time. This type of lighting is particularly useful for beginners, as it allows for intuitive adjustments and experimentation. Continuous lights come in various forms, including LED and fluorescent options, which can produce soft, even light. The advantage of continuous lighting is that it simplifies the process of adjusting and composing shots, especially in video production or live streams. I once attended a friend's photoshoot where they used continuous lighting to capture a cooking demonstration. The consistent illumination helped create a warm atmosphere and allowed the chef to showcase their skills effectively.
2. Strobe Lighting
Strobe lighting, or flash lighting, produces short bursts of intense light, making it ideal for freezing motion and creating sharp images. Strobes are commonly used in studio photography due to their ability to overpower ambient light, allowing for greater control over exposure settings. They come in various power levels and can be adjusted to achieve the desired effect. A friend of mine who specializes in portrait photography swears by strobes for their versatility and the creative effects they can produce, such as dramatic shadows and highlights that enhance facial features.
3. Softboxes
Softboxes are light modifiers that diffuse light to create a softer, more flattering illumination. They are particularly effective in portrait photography, as they help reduce harsh shadows and create a more even light distribution. Softboxes come in various sizes and shapes, allowing photographers to choose the right one for their specific needs. During a recent photoshoot, I noticed how my friend used a large softbox to illuminate their model. The result was a beautifully lit portrait that showcased the subject's features without overwhelming them with harsh light.
4. Umbrellas
Umbrella lights are another popular lighting option for studios. They can either reflect light or diffuse it, depending on the type of umbrella used. Reflective umbrellas bounce light toward the subject, creating a wider spread of illumination, while shoot-through umbrellas allow light to pass through, softening the output. Umbrellas are lightweight, portable, and easy to set up, making them a favorite among photographers who need a quick and effective lighting solution. A friend of mine often takes umbrellas on location shoots, as they are versatile and provide great results without the need for complex setups.
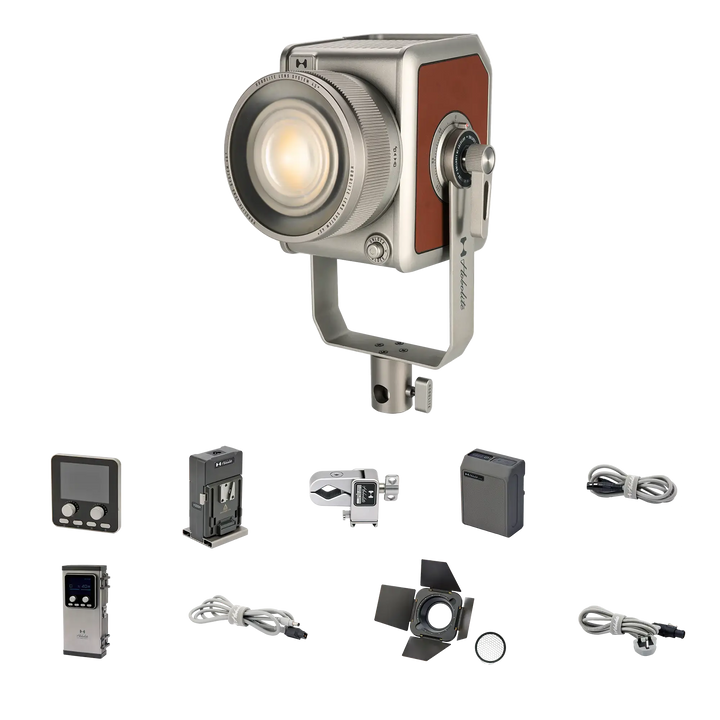
5. Light Modifiers
Light modifiers are essential tools for controlling and shaping light. They include items such as grids, snoots, gels, and reflectors, each serving a unique purpose. Grids help narrow the beam of light, creating more focused highlights, while snoots direct light to specific areas, producing dramatic effects. Gels can change the color of the light, allowing for creative expression in your photography. Reflectors bounce light back onto your subject, filling in shadows and creating a more balanced exposure. My friend once experimented with a reflector during a sunset shoot, and the difference it made in illuminating the subject was incredible. It’s fascinating how these simple tools can elevate an image.
Enhancing Your Photography with Lighting
Understanding the different types of studio lighting equipment is crucial for any photographer looking to enhance their craft. From continuous lighting to strobe lights, softboxes, umbrellas, and various light modifiers, each tool offers unique capabilities that can transform your photographic style. By experimenting with these different types of equipment, you can discover what works best for your creative vision and develop a deeper understanding of lighting principles. So, whether you’re shooting portraits, products, or creative projects, take the time to explore and play with your studio lighting setup. You may be surprised by the stunning results you can achieve!